Tuesday, March 6, 2012

Road tool

A short article explaining some of the basic functions of the road editor tool in Anteworld game in sandbox mode. This is the first part that will be extended later as the improvements to the road tool will be made.

***

Roads

Roads in Outerra engine can be created by opening the road tool from sandbox menu. The tool allows you to create new roads or to modify the existing ones. New roads are created by placing way points (ctrl+LMB), both the existing and new roads can be modified by selecting road node and adjusting its attributes or position.

Here are the keys that can be used with the road tool (you can find them in the help tab of the road tool as well):
mmove the way point on the terrain, copying the terrain contours
shift+mmove the way point on the terrain, with the height locked to the original value
vadjust height of the way point
qmove to the next way point
shift+qmove to the previous way point
bappend a new way point

After the nodes are placed or adjusted, you can press the make road button to physically create the road or to rebuild it with adjusted parameters.

You can also select the road type and markings. The selection is limited at the moment; the road system will support much more road types, profiles and markings when it's finished.


Road nodes

Selected node is show with a node selector, drawn as three concentric circles. The circles show the widths of three important road node dimensions: yellow for road width, orange for border extension of the road, and finally the red showing width of transitional area on the road sides.


While the meaning of the first two should be immediately obvious, the transitional width needs some explanation. It specifies the width of the area across which the height of the road surface transitions into the surrounding terrain. If you are creating roads that are roughly at the same level with the terrain, its effect is not that visible. As soon as the road is elevated above or below the terrain, or the terrain is sloped, the effect of the transitional value shows.

The following pictures show the effect of the transitional width value on how the road is blended with the terrain. Just the single selected node has its transitional value changed:
8m transitional width
23m transitional width
1m transitional width


 Tangents


Roads are created from the placed way points using Cubic Hermite splines (for the interested, the algorithm has been briefly described in an earlier blog post). The splines allow for arbitrary selection of tangent (= the direction of the road at given point). Engine supports three ways of computing the tangents:
  • By default it's computed to be parallel with the line between two neighboring way points. This is OK in most cases when you are freely drawing the road.
  • Fit to match the direction of previous segment
  • Fit to match the direction of following segment
Use the latter two if you want to keep the incoming/outgoing road straight up until the turn, so that the nodes behind or before the turn don't affect the tangents:

Tangent computed from two neighbor nodes
Tangent set to match the previous road segment

Connecting roads

Until there's a tool that will snap roads together, you can only try to join them manually. Here are a few tricks how to do it.

Initial state

Move the last node a bit back (using 'm'), and place additional node at the end of the connecting road. Enlarge the road width to get rid of the sharp connection, and move the node so that there's no gap.


The road you are connecting to is usually slightly sloped, and you need to adjust slant of the road node with which you are connecting, together with the height of the node. The height can be changed either using the elevation± slider, or by entering vertical-move mode using key 'v'.


At the moment the width of the road is not yet actually spline-interpolated, but you can select between two modes using the width interpolation flag.
Linear width interpolation

Saturday, February 25, 2012

Outerra Tech Demo released!

Outerra Tech Demo

Outerra Engine is a unique 3D engine, a world rendering engine capable to seamlessly render whole planets from space down to the ground level. It can use real world data to render the planets realistically, while it also dynamically refines the data using procedural algorithms to provide high ground-level detail.


The engine provides unlimited visibility obstructed only by the planet's curvature, with details ranging from thousands of kilometers down to centimeters. Real time atmospheric rendering, oceans with shore waves.


It can integrate vector data overlays for roads, and land class modifications. Uses the JSBSim Flight Dynamics Model library for high fidelity simulation of aircraft, and Bullet physics engine for simulation of vehicle physics. Terrain and fractal algorithms maximally utilize the GPU, leaving the CPU resources for simulation.


Finally here comes the Outerra tech demo, coming together with the alpha release of our game Anteworld.

Download

Please check the latest version updates at the forums.

Outerra Anteworld 0.7.13.3478 (Gamefront)
Outerra Anteworld 0.7.13.3478 (My Drive)

Driver issues, graphics glitches Please check the Graphics driver issues topic to resolve the most common issues with the drivers.


Features
This alpha release features:
  • A complete, real scale planet Earth that can be explored
  • Created from real elevation data with resolution 90m where available, 1km resolution for oceans; data are dynamically downloaded as you go
  • Further refined by fractal-based procedural techniques down to centimeter-level details
  • Vector-based road system that integrates with the procedurally generated terrain
  • Ability to place static stock objects and drive provided vehicles

The demo comes with the whole planet Earth that can be explored in a free-camera mode or in a 8-wheeler truck. People who like it and/or want to support us and the development of Outerra engine can buy the alpha release of Anteworld at a discounted price ($15), half the amount for the final release. Doing so will give you access to regularly released alpha/beta updates of the game, together with the final version when it's done. The price will gradually rise with each major release.
You will also become our beta-testers, with ability to influence the priorities of the development.

The full game includes also a plane and a helicopter, and basic sandbox tools that allow you to create roads and runways and place stock objects. A model importer and vehicle configurator that will allow creating custom models and vehicles will be coming soon in an update to the game.

The demo contains a few locations around the world (a couple of them were created by our tester Pico). Data for the default location are already included within the installer, the rest of it will be downloaded automatically on demand as you explore the world (note: proxy servers aren't supported yet for data download). The total size of the data is around 12GB, but normally you'll download just a fraction of the size, unless you traverse the whole planet surface at a low altitude.

Hardware requirements

Outerra engine runs on OpenGL 3.3 and requires recent graphics drivers. It will warn you if your drivers are outdated, or even refuse to run in case you've got old ATI drivers that are known not to work at all.
The minimum requirements are:
  • Nvidia 8800GT or better, ATI 4850 or better
  • 512MB GPU memory
  • a 2-core CPU
Recommended:
  • Nvidia 460GTX or better, ATI 6850 or better
  • 1GB GPU memory

Limitations of current alpha state of the technology

This alpha release comes out to show the potential of the engine, but it still lacks many features commonly found in other engines, and especially the effects are postponed until the major features are implemented.
The demo currently comes with just a single biome - northern type forests. There are no rivers and lakes implemented yet, and no weather yet.
Almost all the areas are work in progress.


Known Issues

There are still some driver issues with ATI cards, the most problematic being the 4xxx line, where there are still some seemingly random crashes.
The alpha state of the engine also means that it's not very optimized yet. It consumes more GPU memory than it should, and spends some time rendering things that is not eventually visible etc.

Driver issues: Please check the Graphics driver issues topic on our forums to resolve the most common issues with the graphics card drivers.


Anteworld game

Anteworld* is a world-building game on a massive true-to-life scale of our planet. Returning aboard an interstellar colonizer ship built in the Golden Age of Mankind, players arrive on the planet earth to discover civilization and humanity vanished. They will have to rebuild the civilization - exploring, fighting, and competing for resources while searching for clues to the disappearance of humanity.

The game will contain several modes, the basic one will be a single-player game but with player-built locations being synchronized and replicated between clients. That means player can settle in a free location of his choice where he can build and play, and when he goes exploring he'll be able to observe and visit other sites where other players are building their world.

There's going to be also a multiplayer mode for gaming in the existing world.
Sim-connect mode should allow to use Anteworld as an image generator for another simulation program.
In fact, Anteworld is meant to create the basis for an Outerra game/sim platform, allowing to create mods and new game modules that would run on the existing backend.

*The name comes from Latin prefix Ante-, with the meaning of prior-to in time. A world that was. There's going to be an accompanying novella written by C.Shawn Smith that should be loosely tied to the game.
Here's a sample, the epilogue: The Outerra Initiative - Epilogue

Wednesday, October 12, 2011

Basic environment sounds

We have added sound system (based on OpenAL), and provided aircraft with engine sounds using preliminary sound samples. Once the sound system was working, I went to add some basic environmental sounds so that the world feels more alive.

The whole system works by sampling coarse level environment data points surrounding the camera, using a 5x5 cornerless grid. Sound emitters are then set up at the places of the points, and each emitter is assigned a sound buffer corresponding to the type of environment.


To hide the grid layout, the emitters are set up to start attenuating the sound only from a distance that is larger than half the grid step. This works almost alright, except that the unattenuated zone also spans upwards, which doesn't feel natural. Later we'll have to implement a custom attenuation function that will handle it.

At the moment there are just 4 environment types - grass, open sea, shoreline and forest. Each emitter of given type can use only one of two sound samples (for now), that are pseudorandomly picked for given location. Locations are identified using a global unique identifier; this identifier is also used to manage the reuse of sound emitters.

Apart from these ground sources there is also another layer of emitters that are used to provide sounds of wind and rustling of tree leaves. They are positioned higher above the ground.

Following video shows it in action. The sound of wind in the last part of the video (in forest) is too loud, especially when the leaves and branches aren't moving yet.


***

In other news, we have started a closed beta testing of our alpha demo (yea, beta of alpha ). Here's the announcement and some info from it.

It goes pretty well, meaning we are getting lots of crash and bug reports and unexpected behavior reports on various combinations of hardware, OS versions and internet settings.
It's keeping us quite busy at the moment.

***

There's also a new truck model with digital camouflage texture, that we want to use for our demo game:


The camouflage is a modern type that is apparently not so well-known, and from the initial reactions it seems that Minecraft has spoiled it for people who didn't know about it before :-)

Friday, July 29, 2011

White balance

When implementing the fog mentioned in the previous post, I observed a weird thing happening: the fog wasn't white, as I expected, but it had a dirty Beige tint making it look a bit like a smog or something. But since the implementation didn't use different absorption and scattering coefficients for RGB components, and thus the color of the sun light shouldn't have been modified, I thought it was a bug, and neglected it until most of other issues were solved.
But then, after inspecting all the code paths, I came to the only conclusion that the computation is right and the problem must be in the interpretation. So I tried to convince myself that the fog must be white, and the tint actually isn't there. Almost made it, too.


But the machine coldly asserted that the color wasn't white as well. Didn't bother with any hinting as to why, though.
Apparently the incoming light that was scattering on fog particles was already this color, even though the sun color was not modified in any way, unlike in the previous experiments.

Interpretation?

The thing is that sunlight really gets modified a bit until it arrives to the planet surface. The same thing that is responsible for blue sky causes this: a small part of the blue light (and a smaller part of the green light too) gets scattered away from the sun ray. What comes down here has a slightly shifted spectrum.
But how come we see the fog white in real life?
Turns out, everything is fake.

The way we perceive colors is purely subjective interpretation of a part of the electromagnetic spectrum.
And as it is easier for the brain to orient in the environment when the sensors don't move, it is also simpler to stick with constant properties on objects. Our brain "knows" that a sheet of paper is white, and so it will make it appear white in wildly varying lighting conditions. This becomes apparent when you use a digital camera without adjusting for the white color - the results will be ugly.

So basically that's why we have to implement an automatic white balancing, at least until we all have full surround displays and our brains magically adapt by themselves. By the way, playing in fullscreen in the dark room with uncorrected colors slowly makes it adapt too.


Implementation

Our implementation tries to mimic what the perception actually does. By definition, a white sheet appears to be white under a wide range of lighting conditions. So we are running a quick computation that uses the existing atmospheric code on GPU, that computes what light reflects off a white horizontal surface. The light has two components - sun light that reflects at an angle and its illuminative power diminishes as the sun recedes from zenith, and the second one is the aggregated light from the sky. Once this compound color is known, we could perform the color correction as a post-process, but there's another way - adjusting the color of sun so that the resulting surface color is white. This has an advantage of not affecting the performance at all, since the sun color is already taken into equation.

While this algorithm doesn't mimic the human perception precisely, i.e. the actual process is more complex and depends on other things, it seems to be pretty satisfactory, though I expect further tuning.

Some of the properties: it extends the period of day that seems to have a "normal" lighting, and removes the unnatural greenish tint on the sky:


During the day it compensates for the brownish light color by making the blue things bluer. Can't say the old colors were entirely bad though.


So long, and thanks for all the fish

Thursday, July 21, 2011

Fog and dust

In addition to the existing atmospheric model that already accounts for aerosol particles in air, we have been working also on incorporating ground fog and dust. It's defined by several parameters that determine its density, light scattering properties and boundary altitude. Shaders then compute resulting attenuation and scattering of sun light for terrain and objects. The code is similar to the code computing optical properties of water, using different values and omitting the upper reflective layer.


Viewing valleys of fog from a greater distance, illuminated by evening sun.


When the amount of scattering is lowered, one gets appearance of dust. Also, thicker layers of dust/mist can cast the terrain down below into darkness


There are several things that need to be done yet - currently the fog settings act globally, covering the whole planet in a veil of mist. There's no modulation that would give the fog a nicer, non-uniform look.

Ultimately, fog (or dust) should appear dynamically according to a probabilistic model that would describe chances of it forming at a given place (climate, precipitation) on the planet in given time of day/year. Or using a real time weather report feed.

Wednesday, July 13, 2011

Alien planet Earth

Rendering our planet "alienized", using a different set of basic materials for fractal mixer, with changed parameters of atmosphere, sun and water.

Scattering of light in the atmosphere determines both the color of sky and sunsets. We can see a blue sky because the blue light is more likely to bounce off the air molecules than the green and even more than the red components of sun light. As the light from sun travels through the atmosphere above us, some of it gets scattered away from the ray and towards our eyes. The same effect is responsible for red sunsets - as the sun sets, light from it has to travel a longer way through a denser layers of atmosphere. By the time it reaches us, most of the blue and green light gets scattered away from the ray, leaving only the most persistent red component.

This effect is simulated in Outerra, and so we are able to play with it. What if the atmosphere consisted of different gases and the scattering characteristic was different?

In the following video we are showing planet Earth that was "alienized". The atmosphere in it scatters the green light best, which you can see not only on the sky itself but also on the shaded parts that are not lighted by sun but only by a portion of the sky.
The sun has got an orange shade, which you can see mainly on the horizon (the sun itself is too bright so looking at it directly saturates the color to white).

The absorption of light in the water has been altered as well - normally, the red light gets only so far in the water, when it almost entirely disappears. Here, the medium absorbs the green and blue light instead, letting the red one to penetrate into depths. Of course, since the water surface largely reflects the sky at an angle, the ocean appears to be green in the distance.

At the end there's also a short sequence with a red-orange atmosphere.


Here are some screens showing it under various settings:

http://www.outerra.com/shots/alien/alien1.jpg

Milk water & yellow skies:

http://www.outerra.com/shots/alien/alien3.jpg

Violet atmosphere:

http://www.outerra.com/shots/alien/alien4.jpg

No atmosphere (or no atmospheric scattering). This is what you'd get for example on the Moon:


http://www.outerra.com/shots/alien/alien5.jpg

Sunday, July 3, 2011

Book: 3D Engine Design for Virtual Globes

3D Engine Design for Virtual Globes is a book by Patrick Cozzi and Kevin Ring describing the essential techniques and algorithms used for the design of planetary scale 3D engines. It's interesting to note that even though virtual globes gained the popularity a long time ago with software like Google Earth or NASA World Wind, there wasn't any book dealing with this topic until now.


As the topic of the book is relevant also for planetary engines like Outerra, I would like to do a short review here.
I have been initially contacted by Patrick to review the chapter about the depth precision, and later he also asked for a permission to include some images from Outerra there. You can check out the sample chapters, for example the Level of Detail.

Behind the simple title you'll find almost surprisingly in-depth analysis of techniques essential for the design of virtual globe and planetary-scale 3D engines. After the intro, the book starts with the fundamentals: the basic math apparatus, and the basic building blocks of a modern, hardware friendly 3D renderer. The fundamentals conclude with a chapter about globe rendering, on the ways of tesselating the globe in order to be able to feed it to the renderer, together with appropriate globe texturing and lighting.

Part II of the book guides you to the area that you cannot afford to neglect if you don't want to hit the wall further along in your design - precision. Regardless of what spatial units you are using, it's the range of detail expressible in floating point values supported by 3D hardware that is limiting you. If you want to achieve both global view on a planet from space, and a ground-level view on it's surface, without handling the precision you'll get jitter as you zoom in and it soon becomes unusable. The book introduces several approaches used to solve these vertex precision issues, each possibly suited for different areas.

Another precision issue that affects the rendering of large areas is the precision of depth buffer. Because of an old non-ideal hardware design that reuses values from perspective division also for the depth values it writes, depth buffer issues show up even in games with larger outdoor levels. In planetary engines that also want a human scale detail this problem grows beyond the bounds. The chapter on depth buffer precision compares several algorithms that more or less solve this problem, including the algorithm we use in Outerra - logarithmic depth buffer. Who knows, maybe one day we'll get a direct hardware support for it, as per Thatcher Ulrich's suggestion, and it becomes a thing of the past.

Third part of the book concerns with the rendering of vector data in virtual globes, used to render things like country boundaries or rivers, or polygon overlays to highlight areas of interest. It also deals with the rendering of billboards (marks) on terrain, and rendering of text labels on virtual globes.

The last chapter in this part, Exploiting Parallelism in Resource Preparation, deals with an important issue popping up in virtual globes: utilizing parallelism in the management of content and resources. Being able to load data on the background, not interfering with the main rendering is one of the crucial requirements here.

The last part of the book talks about the rendering of massive terrains in hardware friendly manner: about the representation of terrain, preprocessing, level of detail. Two major rendering approaches have their dedicated chapters in the book: geometry clipmapping and chunked LOD, together with a comparison. Of course, the book also comes with a comprehensive list of external resources in each chapter.


We've received many questions from several people that wanted to know how we started programming our engine and what problems we have encountered, or how did we solve this or that. Many of them I can now direct to this book, which really covers the essential stuff one needs to know here.

Tuesday, June 7, 2011

Podcast about Outerra

I've never been much of a speaker, not in my native language and even less so in English. When Markus Völter, the man behind SE Radio and omega tau podcasts, contacted me to make a podcast about Outerra and some of the technology behind it, I initially hesitated. But then I decided that it cannot hurt, and that I must force myself to train my tongue a bit.

So, after some time we recorded a hour long interview and you can listen to it here:

omegataupodcast.net/2011/06/67-rendering-the-world-with-outerra


Beware that I'm really slow speaker with pretty monotonous voice, and together with the technical nature it's probably not consumable for everyone. Enjoy if you can :-)

Monday, May 9, 2011

Bumpy grass effect

Some time ago when I was modifying how dirt roads are being generated, to achieve their better integration into the terrain, I noticed that after one operation the grass close to the dirt tracks got a bumpy look, that had a potential in it to produce a better looking low grass fields.

Recently I have got to those code corners again and decided to play with it more. It's using fractal channels to generate the bumps, subjecting it to several treatments - the effect being smaller on some types of grass, and also changing together with modulating colors.
Here's the result:


For comparison, here's how the same scene looked until recently:


The effect is most visible when the sun is lower, it's achieved just by normal lighting. It should be probably combined with another effect that will make it more attractive during noons - shades from grass blades, visible from the side.


Of course, an important thing will be to combine it with real 3D blades smoothly appearing up close, and to apply the effect on other types of vegetation visible at distance.

A short video showing the thing in motion:

Thursday, April 14, 2011

A comparison of the old and new datasets

Here's the promised comparison between the old and new data. Despite the base terrain resolution being the same in both cases (3" or roughly 90m spacing), the new dataset comes with much better erosion shapes that were previously rather washed out.

The new data come from multiple sources, mainly the original SRTM data and data from Viewfinder Panoramas that provide enhanced data for Eurasia. It appears that the old data were somehow blurred, and fractal algorithms that refine the terrain down didn't like it.

The difference shows best in Himalayas - the screens below are from there, starting with Mt.Everest.

 old   |   new


There are also finer, 1" (~30m) resolution data for some mountainous areas of the world, and we plan to test these too - interested to see how it affects the size and changes the look.

→ forum link

Wednesday, April 13, 2011

A new terrain mapper tool

Our old terrain mapping and compression tool has been recently replaced by a new one, developed from scratch. The old tool has been the only piece that was not done completely by us (core Outerra people), and as the result it felt somewhat "detached" and not entirely designed in line with our concepts. It was quite slow and contained several bugs that caused artifacts mainly in coastal regions.

What's going on with the tool? Its purpose is to convert terrain data from usual WGS84 projection into a variant of quadrilateralized spherical cube projection we are using, along with wavelet-based compression of the data during the process. It takes ~70GB of raw data and processes them into a 14GB datased usable in Outerra, endowing it with ability to be streamed effectively and to provide the needed level of detail.


With the aforementioned defects in mind, and with the need to compile a new dataset with a better detail for northern regions above 60° latitude, we've decided to rework the tool, in order to speed it up and to extend the functionality as well.

I originally planned to implement it using CUDA or OpenCL, but after analyzing it deeper I decided to make it a part of the engine, using OpenGL 3.x shaders for the processing. This will allow for creating an integrated and interactive planet or terrain creator tool later, which is worth it in itself.

The results are surprisingly good. For comparison: to process the data for whole Earth, the old CPU-only tool needed to run continuously for one week (!) on a 4-core processor. The same thing now takes just one hour, using a single CPU core for preparing the data and running bitplane compressor, and a GTX 460 GPU for mapping and computation of wavelet coefficients. In fact the new tool is processing more data, as there are also the northern parts of Scandinavia, Russia and more included in the new dataset.

All in all it represents roughly a 200X speedup, which is way more than we expected and hoped for. Although GPU processing plays a significant role in it, without the other improvements it would show much less. The old tool was often bound on I/O transfers - it synchronously processed and streamed the data. The new one does things asynchronously, additionally it now reads the source data directly in packed form, saving the disk I/O bandwidth - it can do the unpacking without losing time because the main load has been moved from CPU to GPU. Another thing that attributed to the speedup is a much better caching mechanism that plays nicely with the GPU job.

There's another interesting piece used in the new tool - unlike the old one, this traverses the terrain using adaptive Hilbert curves.

Hilbert curve is a continuous fractal space-filling curve that has an interesting property - despite being just a line, it can fill a whole enclosed 2D area. Space-filling curves were discovered after mathematician Georg Cantor found out that an infinite number of points in a unit interval has the same cardinality as infinite number of points in a any finitely dimensional enclosed surface (manifold). In other words that there is a 1:1 mapping from points on a line segment into the points of a 2D rectangle.
These functions belong to our beloved family of functions - fractals.


In the mapping tool it's being used in the form of a hierarchical recursive & adaptive Hilbert curve. While any recursive quad-tree traversal method would work effectively, Hilbert curve was used because it preserves locality better (which has a positive effect on cache management), and because it is cool :)
Here is a video showing it in action - the tool shows the progress of data processing on the map:


Apart from the speedup, the new dataset compiled with the tool is also smaller - the size fell down by 2GB to ~12GB, despite containing more detailed terrain for all parts of the world.

I'm not complaining, but I'm not entirely sure why is that. There was one minor optimization in wavelet encoding that can't explain it. The main suspect is that the old tool was encoding wide coastal areas with higher resolution than actually needed.

***

Coming next - a comparison of new and old datasets. Apart from providing a more consistent terrain detail for whole world, the new dataset also comes with enhanced mountain shapes in several places.

Friday, February 18, 2011

Ocean Rendering

Let me first say that I'm often visiting my own blog to read how I did certain things. This is mostly true for some of the older, more technical posts. I decided to blog about recent water rendering development in a way that will be helpful for me in time when my brain niftily sends all the crucial bits to desert. I apologize in advance if some pieces seem incoherent.

Now for the rendering of water in Outerra.

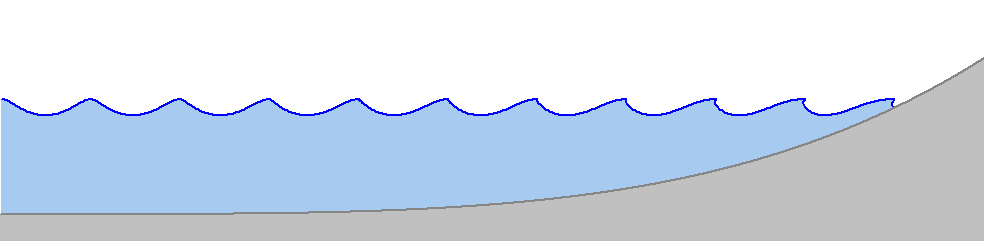
There are two types of waves mixed - open sea waves with the direction of wind (fixed for now), and shore waves (the surf) that orient themselves perpendicularly to the shore, appearing as the result of oscillating water volume that gets compressed with rising underwater terrain.

Open sea waves are simulated in a usual way by summing a bunch of trochoidal (Gerstner) waves with various frequencies over a 2D texture that is then tiled over the sea surface. Obviously, the texture should be seamlessly tileable, and that puts some constraints on possible frequencies of the waves. Basically, the wave should peak on each point of the grid. This can be satisfied by guaranteeing that the wave has an integral number of peaks in both u,v texture directions. Resulting wave frequency is then

Other wave parameters depend on the frequency (or its reciprocal, the wavelength). Generally, wave amplitude should be kept below 1/20th of wave length, as larger ones would break.
Wave speed for deep waves can be computed using the wavelength λ as:


Direction of waves can be determined by manipulating the amplitudes of generated wave, for example the directions that lie closer to the direction of wind can have larger amplitudes than the ones flowing in opposite direction. The opposite wave directions can be even suppressed completely, which may be usable e.g. for rivers.


Shore waves form as the terrain rises and water slows down, while the wave amplitude rises. These waves tend to be perpendicular to shore lines.

In order to make the beach waves we need to know the distance from particular point in water to shore. Additionally, a direction vector is needed to animate the foam.

Distance from shore is used as an argument to wave shape function, stored in a texture. This shape is again trochoidal, but to simulate a breaking wave the equation has been extended to a skewed trochodial wave by adding another parameter determining the skew. Here's how it affects the wave shape:
The equation for skewed trochoidal wave is:
Skew γ=1 gives a normal Gerstner wave.
Several differently skewed waves are precomputed in a small helper texture, and the algorithm chooses the right one depending on water depth.


Distance map is computed for terrain tiles that contain a shore, i.e. those with maximum elevation above sea level and minimum elevation below it. Shader finds the nearest point of opposite type (above or below sea level) and outputs the distance. Resulting distance map is filtered to smooth it out.
Gradient vectors are computed by applying Sobel filter on the distance map.

Gradient field created from Gaussian filtered distance map

Both wave types are then added together. The beach waves are conditioned using another texture with mask changing in time so that they aren't continual all around the shore.

Water color is determined by several indirect parameters, most importantly by the absorption of color components under the water. For most of the screen shots shown here it was set to values of 7/30/70m for RGB colors, respectively. These values specify the distances at which the respective light components get reduced to approximately one third of their original value.

Red: 7m, Green: 30m, Blue: 70m, Scattering coefficient: 0.005Red: 70m, Green: 30m, Blue: 7m

Another parameter is a reflectivity coefficient that tells how much light is scattered towards the viewer. Interestingly, scattering effect in pure water is negligible in comparison with the effect of light absorption. Main contributor to the observed scattering effect is dissolved organic matter, followed by inorganic compounds. This also gives seas slightly different colors.

Scattering coefficient: 0.000Scattering coefficient: 0.020

Here's a short video showing it all in motion.


An earlier video that was posted on the forums with underwater scenes:


TODO
Water rendering is not yet finished, this should be considered a first version. Here's a list of things that will be enhanced:
  • Better effect for wave breaking. This will probably require additional geometry, maybe a tesselation shader could be used for that.
  • Animated foam
  • Enhanced wave spectrum - currently the spectrum is flat, which doesn't correspond to reality. Wave frequencies could be even generated adaptively, reflecting the detail needed for the viewer.
  • Fixing various errors - underwater lighting, waves against the horizon, lighting of objects on and under the water, LOD level switching ...
  • Support for other types of wave breaking
  • Integrating climate type support to the engine, that will allow different sea parameters across the world
  • UI for setting water parameters
  • Reflect the waves in physics for boats

A few of ocean sunset and underwater screenshots that were posted on the forums during the development.